折腾 HP T430 Thin Client
距离上次写博客居然已经将近两年了,时间过得真快。最近一直在忙,国庆终于有空折腾一下自己的玩具,刚好捡的垃圾 HP T430 Thin Client 也到货了,趁着有时间折腾一下它,并做个记录。先放个折腾的效果图(看起来很是简陋):

基本配置
这个 HP T430 的配置为 Intel Celeron Processor N4000 (1.1 GHz up to 2.6 GHz), 2G RAM + 16 G EMMC,千兆网卡,170 入手的(充电器 15,电源 25,快递 20),到手后决定先刷个 BIOS(原版的 BIOS 还是 2018 年的)。
BIOS 下载地址: https://support.hp.com/us-en/drivers/selfservice/hp-t430-thin-client/21316595
不知道为啥,选 win 10 的 BIOS 版本比 Linux 要低,这里下载的是 N41 的 BIOS,发布日期为 2022.6.27(听说能刷 N44 的,但是手头没编程器还是别作死了),下载后解压出目录 SWSetup\SPI40825,其中 BIOS Flash.htm 描述了几种刷 BIOS 的方案,其中尝试了 Update from Computer Setup 看起来它是将 BIOS 更新的 efi 应用写入了 U 盘的 HP 目录,然后由 BIOS 去主动调用来进行更新,不知道是不是因为我手头的板子 BIOS 版本太低,怎么试都不成功,最后放弃思考直接把 Win\N41_0110.exe 拷到装有 PE 的 U 盘里,在 PE 下进行更新。
剩下的步骤也就是开启 VT-d,设置来电自启,因为打算做软路由(万物皆可软路由),同时也因为把开关焊烂了(手残是这样的)。
PVE
之前一直看群友搞了各种 j1900,锐角云,并且在上面折腾了一堆玩具,趁着这个机会也来折腾一下,当作少有的娱乐活动(然而这货只有 2G 内存 说实话有点蔡)。
换源
没啥讲究,就是 PVE 有个企业源,不加订阅没法用,可以使用非订阅的源
/etc/apt/sources.list:
1 | deb https://mirrors.ustc.edu.cn/debian bullseye main contrib non-free |
/etc/apt/sources.list.d/pve-enterprise.list:
1 | #deb https://enterprise.proxmox.com/debian/pve bullseye pve-enterprise |
兼容 emmc
由于 PVE 本身的安装脚本并不支持安装到 EMMC 上,安装时会提示 Unable to get device for partition 1 on device /dev/mmcblk1,因此需要使用 Debug mode 进入 PVE 的安装盘,在进入安装 GUI 前修改 /usr/bin/proxinstall 来添加对 mmcblk 的支持
1 | } elsif ($dev =~ m|^/dev/[^/]+/hd[a-z]$|) { |
参考资料:解决 Proxmox VE 无法安装到 eMMC 上的问题
LXQt
安装后想着,闲着有点浪费,装个 DE 试试,然而折腾了一圈,发现 KDE 和 xfce4 都跑不动,最后装了个 LXQt(然而只是个玩具,Firefox 都打不开)
1 | apt install lxqt lightdm |
然而这个过程中还吃了一口屎,LXQt 使用 ConnMan 来管理网络连接,和 PVE 打架了,直接直接导致开机缓慢和无法上网,解决方案也很简单,卸掉就好了
1 | apt purge connman |
Openwrt
终于来到正头戏了,也是本次折腾的主要目的,安装一个 openwrt 并将其作为旁路由和透明代理
整个内网的网络为 192.168.2.0/24,机器如下
- 192.168.2.1: 主路由
- 192.168.2.2: PVE
- 192.168.2.3: 待配置的 openwrt
安装
openwrt 本身也是基于 Linux 的操作系统,PVE 则是基于 Debian,那最节省开销的方式显然是将 openwrt 安装为 PVE 的 LXC 容器,从而节省下虚拟化的开销
本来想直接在 LXC 中直接拉取 openwrt 的镜像,但是考虑到方便管理,还是从官网拉取了 amd64 的 rootfs 并自己创建了 CT 模板
链接:https://downloads.openwrt.org/releases/22.03.0/targets/x86/64/openwrt-22.03.0-x86-64-rootfs.tar.gz
为了方便安装(某种强迫症),我并不太希望在命令行中创建 pve 容器,因此希望直接在 web 创建,但是直接创建会提示报错 unable to detect OS distribution,搜索了半天并没有找到在 web 设置 OS type 为 unmanaged 的方法,因此只能手动修改 /usr/share/perl5/PVE/LXC/Setup.pm,让其将 openwrt 识别为 unmanaged
1 | return "alpine"; |
额外的安装配置:
- 特权容器(不配置会导致 openwrt 的 dnsmasq 启动异常,貌似和 ujail 相关,参见 openwrt-22-03-0-rc1-first-release-candidate)
- swap 0
- ram 512
- 磁盘大小 1G
- 4 core
- 关闭防火墙(我也不知道有没有必要,反正顺手点了避免吃屎)
此外还有一些别的配置:
- 开机自启动
- 功能中除了无特权其它全部开启(其实主要是创建设备节点?不开不知道有没有问题,反正我没测)
由于配置的透明代理期望使用 TUN 来实现,因此需要将主机的 /dev/tun 挂载进容器,参考自 OpenVPN_in_LXC
修改 /etc/pve/lxc/100.conf (其中 100 为容器 id),并添加如下语句:
1 | lxc.cgroup2.devices.allow: c 10:200 rwm |
随后只需要启动 openwrt,并在 PVE 控制台中配置其 ip 和网关(参考自 openwrt_as_routerdevice)。
1 | uci set network.lan.ipaddr="192.168.2.3" |
配完网后可以安装一些常用的包来方便管理:
- tmux
- luci-i18n-base-zh-cn
- ip-full # 完整的 ip,支持管理 tuntap 设备等
web 界面:

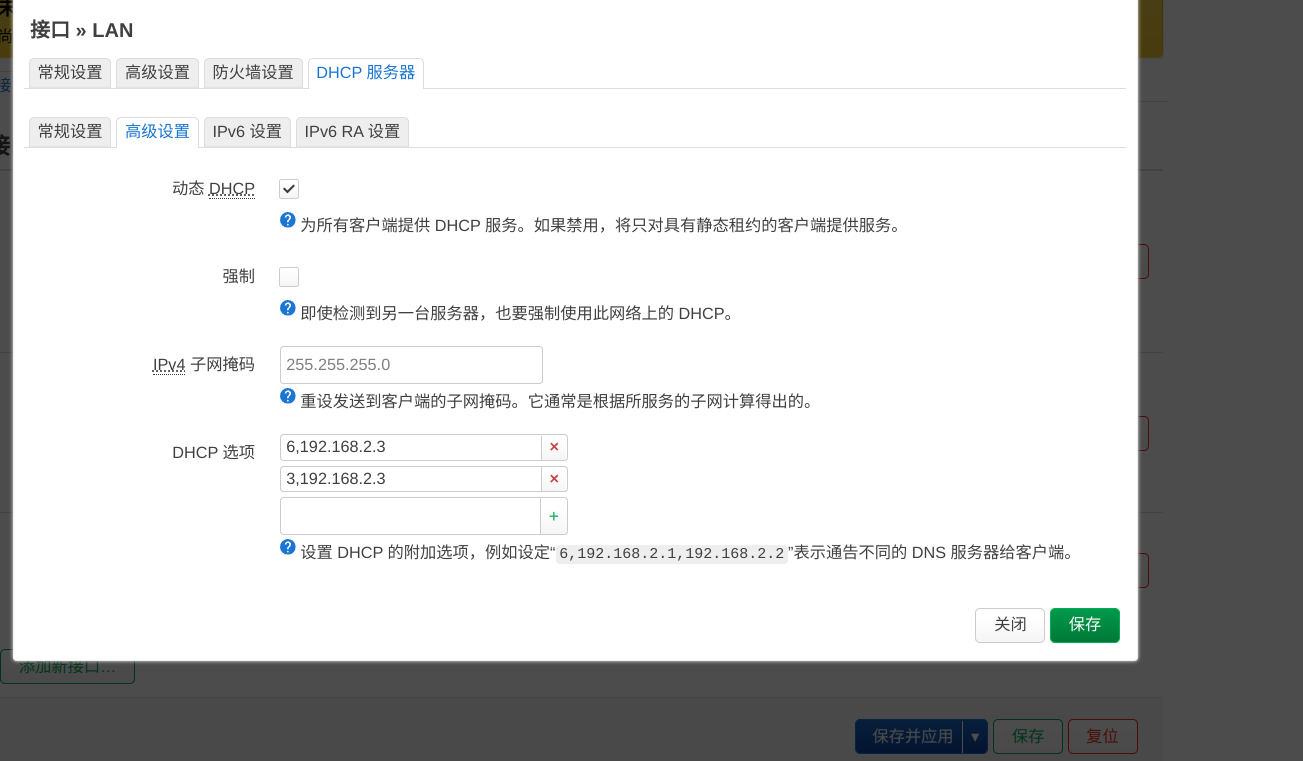
此外还需要在 web 中进行如下设置:
在 接口->LAN-> DHCP 服务器 中设置 忽略此接口,从而避免网络中存在两个 DHCP server。
在 防火墙 中将 Forward 设置为 accpet,不然 sing-box 无法处理其它机器路由来的流量,并会在内核日志中提示 netlink: 'sing-box': attribute type 22 has an invalid length.(参考资料:issue 100)
配置主路由
其实主路由的配置很简单,只需要在 DHCP 中设置通告的网关地址和 dns 地址即可(3 表示网关,6 表示 DNS 服务器,参考自 bootp-dhcp-parameters)
基于 sing-box tun 模式的软路由配置
之前手机上一直使用 SagerNet 作为科学上网工具,其魔改了 v2ray-core 并添加了许多的协议支持,为此之前我也 fork 了一份 Qv2ray 对其进行了简单的适配。后来发现 Project S 项目新出了一个 sing-box,貌似可以作为 v2ray 的替代品(clash 是什么,不熟不熟),因此决定采用其来配置透明代理
我本身有个 vless+ws+nginx tls+cf 的服务端配置,只需要替换 v2ray 的 vless 为 trojan(因为看文档描述 vless 貌似将会废弃)即可:
1 | { |
PS:下载时我还疑惑了一下 amd64 和 amd64v3 是个啥区别,差了一下发现是 golang 针对新的 x86 cpu 做了一些特定优化,只有在新的 cpu 上才能使用,亲测 t430 只能使用 amd64。
openwrt 侧的透明代理配置如下:
1 | { |
其中 dns rule 中的关键字 plusls 和两个域名是为了过滤出代理的域名,让其直接走直连的 dns,从而避免产生查询回环,1088 和 1089 两个 socks 代理则对应了 强制直连 和 强制代理,运行 sing-box 后其会自动创建 tun 设备并设置 ip 和路由,十分方便。
为了方便其自启动,可以添加 /etc/init.d/sing-box 作为服务:
1 |
|
随后为其设置可执行权限以及开机自启动:
1 | chmod +x /etc/init.d/sing-box |